You might have already heard about Photon, the new operating
system from VMWare that is intended to run containers. The intention is for Photon to be installed
on physical hardware, and then let vSphere manage the deployment and
configuration of containers running on your Photon servers. VMware has already released some beta
versions, and you might be interested in deploying it to check things out. After the jump I’ll show you how to quickly
get up and running using vagrant and VirtualBox.
Even though Photon is intended to be deployed to physical
hardware, there’s no reason you can’t test it out on virtual hardware. My recommendation is to use vagrant to do
this. If you aren’t familiar with
vagrant, it is in many ways docker for VMs.
You build a configuration file (Vagrantfile instead of Dockerfile) and
use it to rapidly deploy one or more VMs to an environment. Vagrant can deploy to number of different
providers, including VirtualBox, VMware, and Hyper-V. There are some limitations. The VMware plugin is not free, and the
Hyper-V plugin cannot perform a lot of the internal VM tasks like setting IP
addresses. Due to those limitations, my
provider of choice is VirtualBox. The
downside is that I can’t take my Vagrantfile and deploy it to a vSphere
environment. But I don’t need to.
Before you move any further, you’ll need the following
software installed to play along at home: Git, vagrant, and VirtualBox. I am using Windows, since Microsoft hearts
Linux, but you could do this in Linux too.
First step is to clone the current Photon git
repository. Run "git clone https://github.com/hashicorp/photon-vagrant.git"
from the command line. It will create a
copy of the project locally in your present working directory, so I recommend
navigating to the parent directory you would like it created in.
As you can see the directory has been created and it has one
file: Vagrantfile. If you want to jump
right in, simply issue the command “vagrant up” and vagrant will take
over. The most current image is pulled
down from hashicorp and then deployed as a VM using a headless instance of
VirtualBox.
Once the VM is up and running, you can connect to the VM
using the command “vagrant ssh”. Since
there is only a single VM in the Vagrantfile, you do not need to specify what
machine to connect to. The connection
logs you in as the vagrant user, but you can execute sudo or switch to root, as
I have done below.
By default the Photon image does not have the docker daemon
running, so you will need to use systemctl to get it started. Run “systemctl start docker” to get the
daemon running. If you would like it to
start at boot, run “systemctl enable docker”.
The version of docker pre-installed is 1.8.1 with the image I used. Your mileage may vary depending on the most
current image online. I have found that the docker daemon will not start if there are multiple NICs in the VM. I am working on determining the root cause, but I am betting it is a bug in Photon.
To run a basic container, I executed “docker run busybox
echo hello!”. The command will stand up a simple container and run the command “echo hello!” from the shell. Then it exits the container.
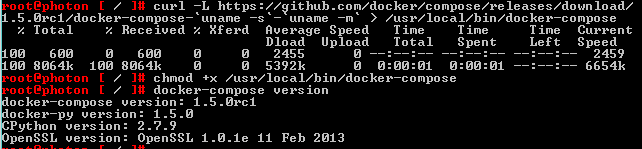
I also wanted to see if docker-compose was working on
Photon, so I pulled down the latest version from github. You can grab the latest release
here. As you can see below, docker-compose
installed and reported back its current version.
Vagrant sets up a shared directory by default so that files
can be easily accessed from within the VM.
The internal mount point is /vagrant, which is mapped to the folder
containing the Vagrantfile. I dropped a
docker-compose project for WordPress in there and navigated to it within the
VM. Then I ran “docker-compose up –d”
and amazingly the whole thing started!
I had to create a NAT rule to access the WordPress page on
port 8080 from my host machine. Once I
did that, I navigated to
http://localhost and
got this page. Included below are the
Vagrantfile and docker-compose.yml files I used for the example.
Labels: Containers, DevOps, Docker, photon, vagrant, virtualization, Vmware