PowerPath Migration Enabler
PowerPath Migration Enabler (PPME) is a tool introduced in EMC PowerPath 5.7 SP1 that will allow you to migrate data between LUN's and/or Storage Arrays without taking any downtime on the host. The tool allows you to migrate data and test for functionality and performance before committing to complete the migration as well as the ability to fail back from the migration...no harm, no foul...
Black magic you say...well here is how you do it...
1) You must be running EMC PowerPath 5.7 SP1 or later
2) The target LUN must be as large or larger then the source LUN
1) Build the new target LUN as you would normally on the target array. Zone and mask the host to the new LUN.
2) Build the LUN as you normally would on your host but DO NOT initialize or format the LUN.
3) Record the Psudeo names of both the source and the target LUN to be involved in the migration. You can retrieve this information using the powermt display dev command:
4) Create the migration session for each of the LUN's to be migrated using the powermig setup command:
powermig setup -src src_psudeo_device_name -tgt tgt_psuedo_device_name -techtype hostcopy
5) Note the migration handle number that is generated when you run the powermig setup command as it will be used for all subsequent PPME commands.
6) Start the migration session using the powermig sync command:
7) Once the migration session is started, you an monitor the status of the session using the powermig query command:
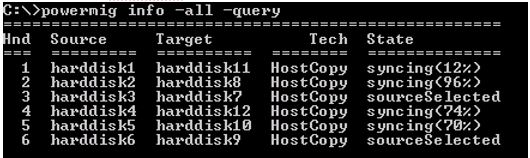
8) If you have a large number of sessions you can use the powermig info -all -query command:
powermig info -all -query
9) Migration states are as follows:
SETUP – Session is setup built not yet started
SYNCING – Bulk copy from source
to target is underway. Reads are from the source and writes are to both the
source and the target.
SOURCESELECTED – Bulk copy is
complete. Reads are from the source and writes are to both the source and the
target.
TARGETSELECTED – Moves the reads
to the target. Reads are from the target and writes are to the source and
target.
COMMITTED – Commits the
migration. Reads and writes are to the target only. No additional writes to the
source.
10) After the session reaches the SOURCESELECTED state you are ready to test for performance and functionality and move the session to TARGETSELECTED. This will allow the reads to take place from the target and the writes to take place to both the source and target LUN's keeping both LUN's in sync. This is done by running the powermig selecttarget command:
powermig selecttarget -handle #
11) If testing is unsuccessful you can failback and move the reads back to the source LUN by running the powermig selectsource command:
powermig selectsource -handle #
12) If testing is acceptable you are ready to commit the migration to take the source LUN out of the data path. At this time you will be solely on the target LUN and no updates to the source will take place. Note that you cannot fail back after you have committed the migration. You commit the migration using the powermig commit command:
powermig commit -handle #
13) After you have committed the migration you need to clean up the migration using the powermig cleanup command:
powermig cleanup -handle #
1) In order to abort the migration and return to the SETUP state use the powermig abort command:
2) The migration speed is controlled via the throttle setting. The more aggressive the throttle setting the faster the migration but you may impact overall performance. The default throttle setting is 2. The throttle can be set using the powermig throttle command:
powermig throttle -handle # -throttlevalue #
Following are the throttle settings and their approximate values: